Sunday 23 October 2016

ARTWORK PROGRESS: bronze sand casting


Note that due to unforseen circumstances I was unable to attend the foundry day.


Air drying clay figures prepared for sand casting.


Sand casting, also known as sand molded casting, is a metal casting process characterized by using sand as the mold material.

There are six steps in this process:


  • Place a pattern in sand to create a mold.
  • Incorporate the pattern and sand in a gating system.
  • Remove the pattern.
  • Fill the mold cavity with molten metal.
  • Allow the metal to cool.
  • Break away the sand mold and remove the casting.


[image source] https://en.wikipedia.org/wiki/Sand_casting#/media/File:Haandform-e.png


Figure creation
Two figures were created for sand casting. With the rationale that if one was too large the other could be used.

The process for creation:
Wire armature based on the templates below


Air drying clay was applied to the armature and wraped up overnight to firm up (but not harden)


The forms were then refined and allowed to harden in preperation for casting. Setting time of air drying clay is approximately 2 days in sunlight. Humidity greatly effects drying time

ARTWORK PROGRESS: 3d scanning and digital manipulation


The intention was two create two figures, this was achieved through the physical creation, scanning and digital manipulation of one figure. The second figure was created purely through the digital manipulation of the first.


The physical figure was created using air drying clay over a wire armature.

Scanning of the clay ( praying man)
The figure was scanned using makerbot for a brief introduction on its use watch the following video.

Step 1
Stating the obvious, but plug in the sanner to a laptop or desktop computer, open the makerbot software and begin the basic scan

Step 2
The model is scanned in the upright position, this takes some time. Note that the surface that the scanner is on cannot be moved. And anyone walking to close to the model being scanned will effect the final outcome.


Step 3
Now for higher accuracy of the scan turn the object on its side, and select the second pass of the scan.


Step 4
Once the scan has been completed, save the 3d model file as a .STL file. This will allow you to load it into a software application such as Geomagic to run a 'mesh doctor' over it. It is highly recommended that you do this step BEFORE opening in CURA, mesh mixer, Sculptris etc. As you may get a "intersecting verticis" error. Mesh Doctor automatically detect and corrects errors in the polygon mesh.
For more information regarding this process watch the following video


Step 5
The model was then loaded into sculptris and had its surfaces modified to the desired texture. My intention for these models was to retain as much of the 'hand'/making marks as possible.


Digital manipulation for the second figure (Crying man)
The model of praying man was loaded into meshmixer.

Step 1
The head was then moved into the hands, and the hands were reshaped to the open position.


Step 2
The hands, face and the neck were then redefined using meshmixer tools.


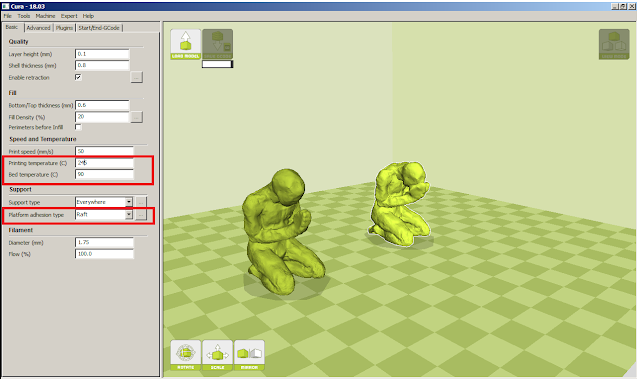
Below are the two models loaded into CURA, ready for test printing.


HOW TO : bronze casting with investment mold


The following is the documentation of the investment bronzecasting process. Due to my assisting in the process the photos in this post were provided by Lisa McNamara and KJ power   For flask preperation click here

Preperation
-two people are preferable for this process. One to remove the flasks from the kiln the other to pour from the cruible.
- have suitable protection available, full face mask, leather chest and arm protection, high temperature gloves, leather spats and chaps (figure 1)
-for bronze smelting the tempurature required in the furnace is apporx 1145'c
-once the furnace has reached temperature and the bronze has molten the flasks can be removed from the kiln

figure 1
figure 2
prepare the work area around the kiln for ease of access, make sure there is a clear path from the kiln to the furnace. In this instance a prep table to place the flasks on is setup next to the kiln.
some of the tools required for bronze casting, note the box in the top left, which is filled with small bronze  cylinders.

Kiln
Keep in mind that the kiln needs to be 650'c when removing the flasks. So crack open the kiln slightly to let the head escape BEFORE reaching in with a pair of tongs to remove.
For this process a map of the flasks inside was provided to aid in estimates of how much bronze would be needed for each flask.
The flasks were removed in pairs and placed on a tray.
This tray was then taken over to the furnace


Furnace
Flux is added to the bronze to assist in the removal of impurities


Before pouring into the flasks the impurities are scrapped off the top of the liquid bronze with ceramic rod. Once completed the molten bronze is poured into the mold. And allowed to sit till the metal begins to cool


The mold is then quenched in a steel bucket of water so that they piece can be removed. For the lower temperature investment materials this quenching process greatly increases the ease of removal, where as the higher temperature investment materials are only partially effected by this process.


The removal of piece from the investment flask is a low tech method, done by working the investment material loose with a screwdriver until the piece is removed


the final product


Tuesday 11 October 2016

ARTIST STATEMENT


Working title
Revelation

Aim of the project

The original intention was to extend semester 1, fabrication and construction's exploration into claritas and the human form. Conceptually this work is exploring the foundation of the christian, jewish and muslim faith, and its relevance.
Focus on the titanic battle between good and evil for the souls of humanity.

This was explored through the creation of a set of figures are displayed in the configuration of a game board. These figures were 3d printed using glow in the dark filament.

The intention was to create a set of figures of two types, one praying man and one crying man. The intention with the human form itself was to  to reduce the form down to its basic components. I am interested in the generalities not the particularities of the individual to create that connection to the self.
This work is intended to be installed in the white room at QCA on a small, low plinth in the configuration of a game that is 'in play'.

The key to this installation is not the figures themselves but the installation.
consideration for the installation and recording process are:

  • the work is discussing the titanic battle for the souls of humanity (within christian, islamic and judism context)
  • the 'game' is in play
  • the board is not needed, as a discussion to our perception of this game, we are unable to see the board
  • the game is not chess or checkers, the rules of this game is unknown to the viewer. We can project a set of rules such as the aformentioned games but they may not apply.
  • in recording a low camera angle which puts the viewer in the action as opposed to being a spectator, in presentation of the installation it is displayed from a low height, to put the installation into 'perspective'.


Theoretical Framework
What is the issue you are addressing in the work? What was the motivation for doing the work?
The work is an essoteric discussion on the foundation of judism, islam and christianity, which keeping in mind that these faiths make up over 50% of the worlds population (Adherents.com ) makes this a relevant contemporary issue. This discussion focuses on the titanic battle for our soul. This verison serves to discuss from an analytical point of view, acting as a reminder that , as a christian, we are involved in this game every day. That we cannot see the board in play and our role with in it. We could be any of these pieces.


Studio Methodology
How did you create the work and was process important in its creation and why?

The intention was two create two figures, this was achieved through the physical creation, scanning and digital manipulation of the praying man figure. The second figure , the crying man, was created purely through the digital manipulation of the first.

The figures were printed with ABS luminescent filament.
For these prints a layer height of 0.2 was used. This greatly reduces print time (almost 50% less) and gave the forms a textured, almost shimmery surface, which supports my conceptual focus of the soul and claritas.

The process of using 3d printing relates back to scripture , 'made in his image' (Genisis 1:27), this is particularly important in regards to the praying man. With the original form being Molded from air drying clay which relates to Isaiah 64:8.
The crying man was digitally manipulated which relates back to the original sin, knowledge.

Context
Compare and contrast your work with  two  other practitioners in the field who have similar aims to yours and support your conceptual ideas.

In my research two artists were integral to the resolved work Amanda Parer and Alberto Giacometti.

Amanda Parer challenges the notion of scale through her enchanting pieces that explore the environment and the role of human beings in it. And tries to communicate this by using light and dark, humour and drama. Her usage of glowing figures has been emulated within my own work but myuse of scale explores our disconnection to the environment and the connection between the viewer and artwork.

The other key artistic influence was Alberto Giacometti's Walking man, the stylised male figure, with no individualised aspects, conveys the human condition. I chose retain some detail of the human form but removed all identifyable facial features and minimised the details of the hand. This process was a step in the direction to abstract the human form to a minimum of information to convey a 'humaness'. This process of abstraction has been furthered for my studio major.

Conclusion
How is your work performing against your aims and theoretical framework?
Do you have any evidence for this?
I feel that the use use of luminescent filament was successful in exploring the concept of claritas, tho i feel that for future projects the possiblility of increasing the intensity of the light will strengthen the aesthetic presence of the pieces. Conceptually the work is distanced and didactical in approach, which is a technique that I intend minimise in my practice now that it has been explored.   

To extend on this project in the future my intention is to upscale the idea of the gameboard with a shift of conceptual focus to the participants place within this game. The figures will be replaced with the participants and the gameboard will become visible

ARTWORK RESEARCH: display of sculpture


The purpose of this post is to visually explore display and recording methods for the glow in the dark 3d printed figures.

consideration for the recording process are:

  •  the work is discussing the titanic battle for the souls of humanity (within christian context)
  • the 'game' must be in play
  • the board may not be needed
  • the game is not chess or checkers, the rules of these games do not apply to the artwork
  • in recording a low camera angle which puts the viewer in the action as opposed to being a spectator


The following images are for personal inspiration only.

Monday 10 October 2016

HOW TO: investment mold making

Investment casting is a technique for making small, accurate castings in refractory alloys using a mold formed around a pattern of wax or similar material which is then removed by heating in a kiln. This post will discuss the process with the intention of bronze casting .

Step 1
Make a figure from wax, the wax used in this project is a soft brown wax, which melts at body temperature making it very easy to manipulate.


Step 2 Spruing
Spruing allows the wax to melt out of the mold and for the metal to get to your piece, You need to try and visualise the metal pouring downward and filling the space that your wax figure occipied, filling from the bottom to the top. If any spaces are small and tight of higher than the rest they will need to be sprued to allow the metal to flow into them. Not having enough sprues or not having them in the proper location may cause imperfections in the piece. For example in figure 1 a sprue is required between the head and the hands. It is also useful to smooth out where the sprues join the figure as that will reduce the time spent removing them later as seen in figure 2. Notice that the wax used for the investment is red, it has a higher melting temperature than the brown wax and will require melting to join together. An alcohole lamp (clean flame) and knife was used for this piece.


Figure 1


Figure 2
Step 3 Preparing the investment flask
Join your sprue to the base of the investment flask, this can be done by heating it with a clean flame, and while partially molten, joined to the base. It is important that aleast 1/4'" of space is left between the edge of the flask and the wax. If not there is a risk that the molten metal will break through the side of the investment material. The same goes for the top of the flask. For this piece the flask height had to be extended. This was achieved by adding a masking tape skirt, which increased the height of the flask (figure 3).


figure 3


Step 4 Investment material
Investment material looks, feels and acts alot like plaster of paris. But requires accuracy in mixing and sets incredibly fast/hard. This particular investment material is suitable for bronze casting which will be fire at high temperatures (750'c approx) for extended periods and will need to withstand the molten broze at 1100'c.
The ratio for mixing is 1000:300   investment material to water.
It is important to adhere to the following process, and make sure that all the materials required such as containers, your flask, mixing sticks, water, investment material, scales etc are close by as the investment material, once water is added, has a maximum working time of 8 mins.


.


- measure out the required investment material, approximately 1.5kg for a single flask
- measure out the require amount of water in a separate container
- gradually add the water to the investment material and stir, keeping in mind that it will set very quickly.
- once a consistancy of thickened cream is achieved,pour the investment material into the flask.


Step 4
Allow the flask to sit. Once an investment mold is fired in the kiln, it has to be used when it is HOT. Also keep in mind that you have about one week to use the flask as the investment material will 'go off' if left any longer. So time is of the essence.


\

Step 5 Kiln
When you are ready the flask goes in a kiln to start the burnout process.
Burnout times are anywhere from 5 - 12 hours. an example of a 5 hour burnout time would be
Hour 1: 300 degrees,
 Hour 2: 700 degrees,
Hour 3 and 4: 1350 degrees,
Hour 5: 1000 degrees - and hold
When preparing to remove the flasks from the kiln the temperature will need to be set to 650'c

HOW TO: CURA settings for PLA or ABS filament for Cocoon 3d printer


this page is under construction 


This post is designed to assist in exporting files from CURA for use on the ALDI Cocoon 3D printer. The settings will cover the differences in exporting for use with the PLA and ABS filaments. In particular the Glow in the dark filament.
CLICK HERE To seeing how to setup CURA for use with the cocoon 3d printer

Setup for PLA
This is the easier of the two filaments to work with.
Set your printing temperature to 215'c  and the bed temperature to 50'c
You may find that you do not even need to set a raft for this filament tho it is recommended.

ABOVE: settings to change to use PLA filament
ABOVE: green PLA filament with raft


Setup for ABS
The following will cover setup and usage of the glow in the dark filament.

STEP 1: setting up CURA
Set printing temperature to 245'c
set bed temperature to 90'c ( the recommendation is to set it to 100'c, but this temperature will evaporate the bonding liquid)
set platform type to raft ( you MUST use a raft with ABS filament to reduce failure rate )

For these prints a layer height of 0.2 was used. This greatly increases print time (almost 50% less) but be aware this this will give the form a textured, almost shimmery surface, which supports my conceptual focus. It is personal choice but for most applications I would recommend using the default Layer height of 0.1mm for the greatest level of detail and minimal unintended texture.


STEP 2: Prepare the bed of the 3d printer.
The printer bed must be completely clean, then apply a liberal layer of Bostik glue to the entire surface. This will aid the raft of your form to adhere to the surface of the print bed and reduce failure rate.
If you use UHU glue you will find that within half an hour of printing it may turn into a white powder, causing the raft to breakfree of the print bed surface.


Use Bostik, avoid UHU due to increased failure rate
A successful double print using Bostik as the adhesive agent.

ABOVE: successful print of 11 figures taking 8 hours. There are some imperfections but is an overall successful print